Did you know that Photoshop has an amazing 3D tool that you can use to create many items for OpenSim and Second Life?
All you need to start is any image that’s in PNG format and has a transparent background.
I get my images from Google Advanced Image Search, which lets you filter for the type of images you are looking for, including license rights. Always make sure that the image you select has a CC0 “public domain” license — this is the safest way to obtain legal images for use of publishing or selling your finished piece.
Another great resource I use is Pixabay, a commercial image site that allows for the free use of its images, including commercial uses.
Here’s what I did when I wanted to create some in-world seashells.
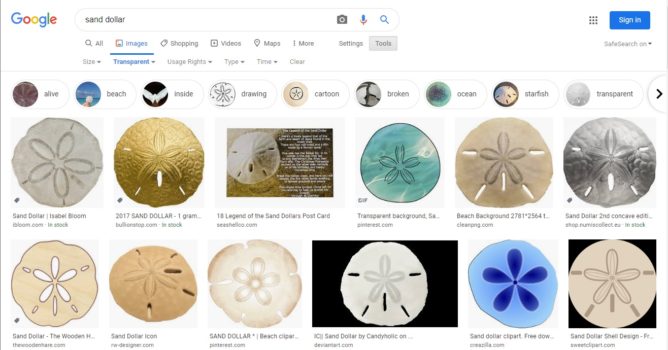
Here are the results of a Google advanced image search for sand dollars:
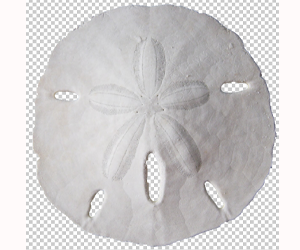
Unfortunately, while this image was in PNG format, the background wasn’t actually transparent, but a gray grid. I had to edit the picture and delete the background so that the image had a transparent background. If you look for images that already have a transparent background, you can skip this step.
You can make shells or flowers for your hair this way. When you search for your images, grab a few different ones and keep a file of them for later use, this saves lots of time and will keep you inspired to create the next shell or flower. Always keep a notecard of where you took your images from, so if you are questioned about the use of a said image you have proof you are not infringing on rights. I keep a note in the file where my models are.
Once you have the image, open it with your Photoshop application.
(If you don’t have Photoshop, you can also use the free Blender program, but that’s for another tutorial.)
On the right of your screen, you will see Properties Panel and down in the middle area you will see the 3D-Layer-Channel choices, make sure it is set to the 3D choice. With 3D choice selected, make sure 3D Extrusion is selected.
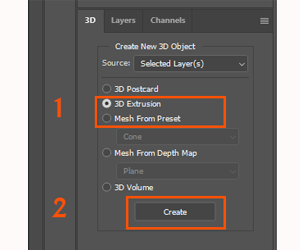
Then click on the “Create” button.
You will get something like this image seen below.
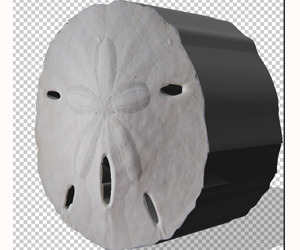
This is great! But, it is not exactly the shape we are seeking.
If you select your sand dollar, to the right on your Properties Panel you will see a blue Shape Preset window. As seen in the image below:
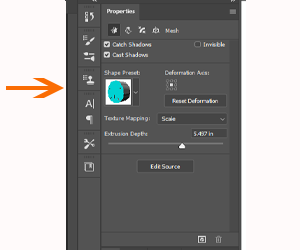
Now, if you select the down arrow in the dropdown menu, you will see various shape presets that you choose to change your shape.
For example, you can also set the extrusion depth.
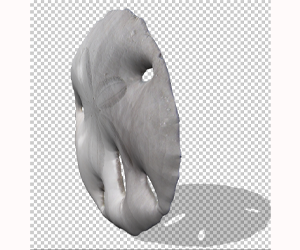
A sand dollar is not too thick, so you would find the poofy shape preset I call it, click the down arrow and choose the sixth selection of the menu on the right. I use it for everything even my hair flowers. It gives it just enough poof to look real.
After you select the preset your sand dollar will look like the image below.
Export and use in OpenSim
Now on to the saving step.
On the top of your desktop, in the toolbar on top of your screen, go to File > Edit > Image > Layer > Type > Select > Filter. Select 3D, then select Export 3D Layer and save the sand dollar as a DAE file to your hard drive for uploading in-world.
Then, in your OpenSim or Second Life viewer, select Build > Upload > Model to bring the 3D shape into your world. Get full details of how to do this in this Second Life mesh model upload tutorial. The process is the same for OpenSim.
You can create an endless number of items like this. I made, a crab, steaks and bacon even, those were probably the first I tried.
Try everything — the results depend on the image and the “Shape Preset†you choose.
Once you’ve brought in the 3D model, the last step would be to add the texture. I generally just upload the original image from my computer as a new texture and apply it to the surface of the model, adjusting it to fit.
Software has become simply amazing. Get out there and try it!
- How to create 3D content for OpenSim with Photoshop - May 2, 2020
- New OpenSim comic celebrates the holidays - December 26, 2019
- How I brought one of my first jewelry creations to the OSCC - December 11, 2019

